Introduction to Wire Rope Inspection
Why Wire Rope Inspection Matters: A Preventative Approach
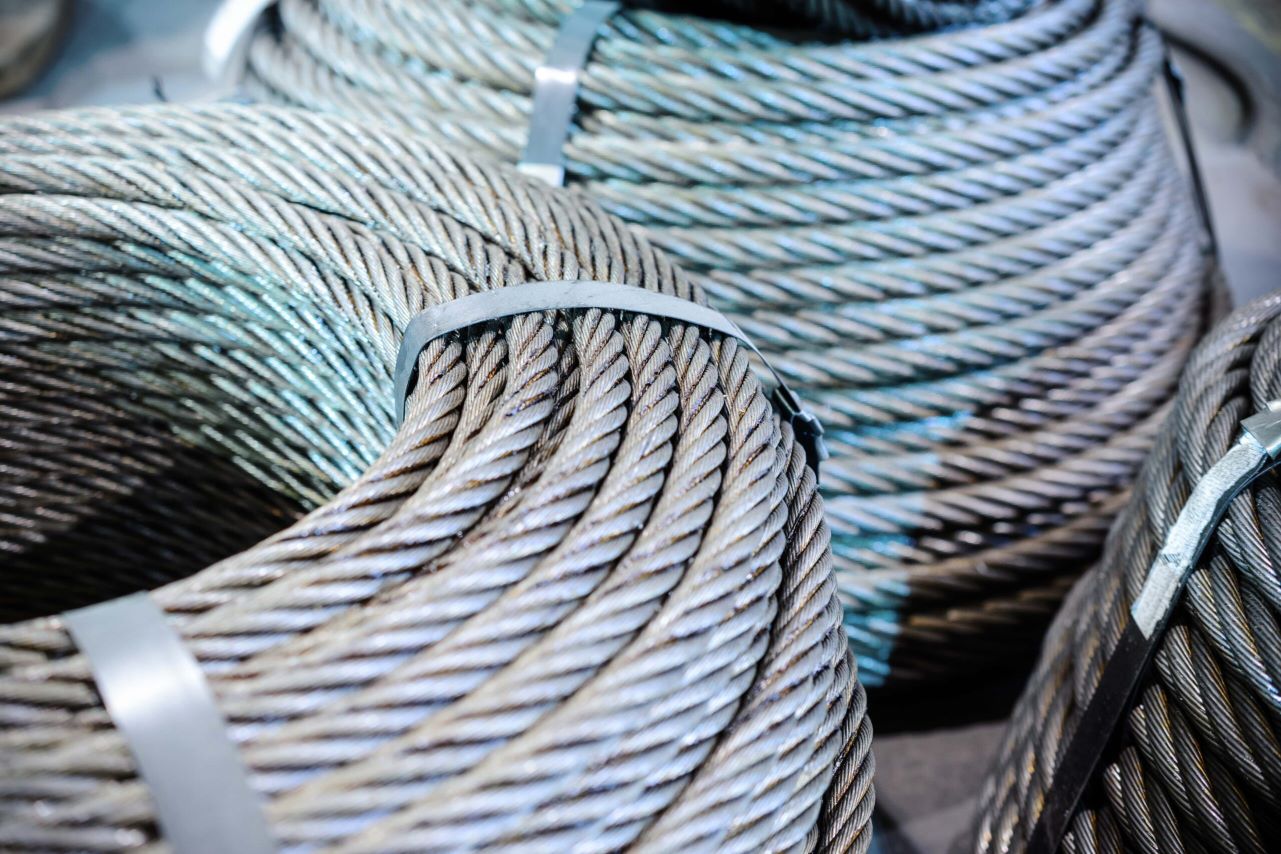
Wire rope is a critical component in countless lifting and load-bearing applications, from cranes and hoists to elevators and bridges. Its strength and reliability are paramount to ensuring safety and preventing accidents. The failure of a wire rope can have devastating consequences, leading to serious injuries, fatalities, and significant damage to equipment and property. Regular wire rope inspection is not merely a recommendation, but a necessity for any operation that relies on this vital piece of equipment.
Preventative maintenance is the cornerstone of a safe and efficient operation, and wire rope inspection is an integral part of that. By identifying potential problems early on, we can take corrective actions before they escalate into catastrophic failures. These inspections help us detect wear, corrosion, damage, and other factors that can compromise the integrity of the rope. This proactive approach allows for timely repairs or replacements, minimizing the risk of accidents and maximizing the lifespan of your equipment.
Understanding Wire Rope Construction: A Beginner’s Guide
To effectively conduct a wire rope inspection, it’s essential to understand the basic components of its construction. A wire rope is composed of several key elements working in concert to deliver strength and flexibility. These elements include wires, strands, and a core.
The individual wires are typically made of high-carbon steel and are twisted together to form strands. The number of wires in a strand can vary depending on the specific design and application of the rope. These strands are then laid helically around a central core, which provides support and maintains the position of the strands. The core can be made of various materials, including fiber (natural or synthetic), wire strand, or even another wire rope.
Different wire rope lay types, such as regular lay and lang lay, affect the rope’s characteristics. In regular lay, the wires in the strands are twisted in one direction, and the strands are twisted around the core in the opposite direction. This construction provides good resistance to crushing and abrasion. In lang lay, both the wires and the strands are twisted in the same direction, resulting in greater flexibility and resistance to wear, but it is more susceptible to crushing. Understanding these different lay types is important for selecting the appropriate rope for a given application and for interpreting inspection findings.
Preparing for the Inspection
Assembling Your Inspection Toolkit: What You’ll Need
Before we begin a wire rope inspection, we need to assemble the right tools. Having the right tools readily available will not only make the inspection process more efficient but also ensure that we can accurately assess the condition of the wire rope. Here’s a list of essential tools:
- Measuring tools: Calipers are used to accurately measure the diameter of the wire rope and identify any reduction due to wear or core damage. A ruler or measuring tape is also needed for measuring the length of lay and the distance between broken wires.
- Magnifying glass or loupe: A magnifying glass or loupe allows us to closely examine the individual wires and strands for signs of wear, corrosion, and other defects that may not be visible to the naked eye.
- Wire brush or cloth: A wire brush or cloth is used to clean the surface of the wire rope and remove any dirt, grease, or debris that may be obscuring our view of the underlying wires.
- Inspection report form or digital template: A standardized inspection report form, whether in paper or digital format, is essential for documenting our findings in a consistent and organized manner. This form should include fields for recording the date of inspection, rope identification, location, condition, and any corrective actions taken.
- Personal Protective Equipment (PPE): Safety is paramount, so we must wear appropriate PPE at all times. This includes gloves to protect our hands from dirt and sharp wires, and safety glasses to protect our eyes from debris.
Safety First: Essential Precautions Before You Start
Before commencing a wire rope inspection, safety must be our top priority. Wire ropes are often used in heavy-duty applications, and any unexpected movement or failure can pose significant risks. Here are some essential precautions to take before starting:
First and foremost, always wear appropriate Personal Protective Equipment (PPE). Gloves are crucial for protecting your hands from potential cuts and abrasions from broken wires. Safety glasses or goggles are essential to shield your eyes from any dislodged particles or debris during the inspection process.
Before physically inspecting any wire rope, ensure that the equipment is de-energized or isolated. This means that the machinery or system using the wire rope is turned off and cannot be accidentally activated during the inspection. This is critical to prevent any unexpected movement of the rope or equipment.
Proper lockout/tagout procedures must be followed to guarantee that the equipment remains de-energized during the inspection. This involves placing locks and tags on the energy-isolating devices to prevent accidental re-energization. Our team in Dubai always double-checks these procedures before any inspection, emphasizing the importance of this step. By adhering to these safety precautions, we can minimize the risk of accidents and injuries during wire rope inspection.
The Wire Rope Inspection Checklist: Step-by-Step
Step 1: Visual Inspection for Obvious Damage
The first step in any wire rope inspection is a thorough visual examination. This involves carefully observing the entire length of the rope for any obvious signs of damage or deterioration. We’re looking for things like broken wires, corrosion, kinking, crushing, or any other visible defects that could compromise the rope’s strength and integrity.
Pay particularly close attention to areas of high stress, such as near terminations and sheaves. These areas are more prone to wear and damage due to the increased loads and friction they experience. Carefully examine the rope at these points for any signs of broken wires, deformation, or corrosion.
Step 2: Identifying and Assessing Wire Breaks
Identifying and assessing wire breaks is a critical step in crane rope inspection and hoist rope inspection. Broken wires are a common sign of wear and fatigue, and their presence can significantly reduce the strength of the rope. The number and location of broken wires are key factors in determining whether a rope should be removed from service.
To accurately assess the extent of wire breaks, we need to count the number of broken wires within a given length of rope. Typically, this is done over a length equal to the rope’s diameter multiplied by a factor specified in the manufacturer’s specifications or industry standards. For example, some standards may require counting broken wires over a length of 6 times the rope diameter.
Refer to the manufacturer’s specifications or relevant industry standards (e.g., OSHA, ASME) for allowable limits on the number of broken wires. These standards provide specific criteria for when a rope should be discarded based on the number of broken wires in a given length or the percentage of broken wires in a strand.
“Regularly checking for broken wires is paramount. A seemingly small number of breaks can quickly escalate into a critical failure point.” – John Smith, Senior Safety Inspector
Step 3: Checking for Corrosion and Rust
Corrosion is a significant threat to wire rope safety, as it can weaken the wires and reduce the rope’s load-bearing capacity. There are different types of corrosion that can affect wire rope, including surface corrosion and pitting. Surface corrosion appears as a general rusting or oxidation of the wire surface, while pitting corrosion is characterized by small, localized holes or pits in the metal.
Assessing the severity of corrosion involves examining the extent and depth of the corrosion. Light surface corrosion may not be a cause for immediate concern, but deep pitting corrosion can significantly weaken the wire and compromise the rope’s integrity. If we observe significant corrosion, we need to carefully evaluate its impact on the rope’s strength and consult discard criteria to determine if replacement is necessary.
Proper lubrication is crucial in preventing corrosion. Lubrication creates a protective barrier between the wire and the environment, preventing moisture and corrosive substances from coming into contact with the metal. Regular lubrication, using an appropriate lubricant for the application, can significantly extend the lifespan of the wire rope and maintain its strength.
Step 4: Measuring Rope Diameter and Reduction
Accurately measuring the diameter of the wire rope is essential for detecting wear and potential core damage. Over time, as the rope is used, the wires can wear down due to friction and abrasion, leading to a reduction in diameter. A significant reduction in diameter can indicate that the rope has lost a substantial amount of its strength and may need to be replaced.
To measure the diameter, use calipers to measure across the widest point of the rope. Take multiple measurements at different locations along the rope’s length to get an accurate average diameter. Ensure that the calipers are properly calibrated and that you are applying consistent pressure to the rope during measurement.
Diameter reduction can also be a sign of core damage. The core of the rope provides support for the strands, and if the core deteriorates, the strands can become loose and the rope’s diameter can decrease. Compare the measured diameter to the original nominal diameter of the rope, which should be provided by the manufacturer. If the measured diameter is significantly less than the nominal diameter, it may indicate wear, core damage, or other issues that require further investigation. Consult discard criteria to determine if the rope needs to be replaced.
Step 5: Examining for Kinks, Crushing, and Distortion
Kinks, crushing, and other forms of distortion can severely weaken a wire rope and increase the risk of failure. These defects can cause localized stress concentrations, reduce the rope’s flexibility, and make it more susceptible to breakage. It’s crucial to carefully examine the rope for these types of distortions during inspection.
Kinks are sharp bends or loops in the rope that can cause the wires to become permanently deformed. Crushing occurs when the rope is subjected to excessive pressure, causing the wires and strands to flatten or distort. Birdcaging is a type of distortion where the strands of the rope separate and resemble the open wires of a birdcage.
These defects can significantly weaken the rope and increase the risk of failure. Ropes with significant distortion should be removed from service immediately. Never attempt to straighten or repair a kinked or crushed rope, as this can further compromise its integrity.
Step 6: Inspecting End Terminations and Fittings
End terminations and fittings are critical components of a wire rope system, as they connect the rope to the load or equipment. These terminations must be in good condition and properly installed to ensure the safe and reliable transfer of load. Failure of an end termination can have catastrophic consequences, leading to dropped loads and serious accidents.
Check for signs of wear, corrosion, or damage to end terminations. Look for cracks, deformation, or excessive wear on the fittings. Ensure that the fittings are properly installed and tightened according to the manufacturer’s specifications. Loose or improperly installed fittings can slip or fail under load.
Damaged or worn fittings should be replaced immediately. Never attempt to repair a damaged fitting, as this can compromise its strength and integrity. Use only fittings that are designed and rated for the specific wire rope and application. Our team in Dubai has seen firsthand the importance of using the correct fittings to prevent failures.
Step 7: Evaluating Sheave and Drum Condition
Sheaves and drums are essential components in a wire rope system, as they guide and support the rope as it moves. The condition of these components can have a significant impact on the lifespan and performance of the rope. Worn, damaged, or misaligned sheaves and drums can cause excessive wear, friction, and stress on the rope, leading to premature failure.
Inspect sheaves and drums for wear, damage, or misalignment. Look for grooves, cracks, or other signs of wear on the sheave surfaces. Ensure that the sheave grooves are properly sized for the wire rope. A groove that is too narrow can pinch the rope, while a groove that is too wide can allow the rope to flatten or deform.
Replace any worn or damaged sheaves or drums. Worn sheaves can cause excessive friction and wear on the rope, while damaged sheaves can have sharp edges that can cut or abrade the wires. Misaligned sheaves can cause the rope to rub against the sides of the groove, leading to uneven wear and premature failure.
Step 8: Documenting Your Findings: Creating a Detailed Report
Documenting all inspection findings in a detailed report is a crucial step in the wire rope inspection process. A well-documented report provides a record of the rope’s condition at the time of inspection, which can be used for future reference and to track changes in the rope’s condition over time. This information is essential for making informed decisions about maintenance, repair, and replacement.
Include information such as the date of inspection, rope identification (e.g., serial number, location), condition (e.g., number of broken wires, presence of corrosion, diameter measurements), and any corrective actions taken (e.g., lubrication, repair, replacement). Maintain a record of all inspections for future reference. This record should be readily accessible and should include all inspection reports, as well as any related documentation, such as manufacturer’s specifications and maintenance records.
Interpreting Inspection Results and Making Decisions
Understanding Discard Criteria: When to Replace Wire Rope
Understanding discard criteria is essential for determining when a wire rope should be removed from service. Discard criteria are specific guidelines that outline the conditions under which a rope is considered unsafe for continued use. These criteria are based on factors such as the number of broken wires, the extent of wear, the presence of corrosion, and the degree of distortion.
Refer to the manufacturer’s specifications and relevant industry standards (e.g., OSHA, ASME) for discard criteria. These documents provide specific guidelines for when a rope should be replaced based on various factors. Emphasize the importance of replacing wire rope when discard criteria are met or exceeded. Continuing to use a rope that does not meet these standards can have catastrophic results.
Approximately 30% of wire rope failures are attributed to improper maintenance and lack of inspection.
Implementing Corrective Actions: Repair or Replace?
When inspection findings reveal issues with a wire rope, we must decide on the appropriate corrective action. The two primary options are repair or replacement. The decision of whether to repair or replace a rope depends on several factors, including the severity of the damage, the age of the rope, and the cost of repair versus replacement.
If the damage is minor and localized, such as a small number of broken wires in a non-critical area, repair may be a viable option. However, if the damage is extensive or widespread, replacement is typically the best course of action. The age of the rope is also a factor to consider. Older ropes may have experienced significant wear and fatigue, even if the visible damage is minimal. In such cases, replacement may be more prudent than repair.
The cost of repair versus replacement should also be considered. In some cases, the cost of repairing a rope may be close to or even exceed the cost of replacing it. In these situations, replacement is generally the more cost-effective option. Ultimately, the decision of whether to repair or replace a wire rope should be based on a careful evaluation of all relevant factors, with the primary goal of ensuring safety and preventing accidents.
Maintaining Wire Rope for Longevity
Lubrication Best Practices: Extending Rope Life
Proper lubrication is essential for maintaining wire rope safety and extending the lifespan of the rope. Lubrication reduces friction between the wires and strands, preventing wear and corrosion. It also helps to keep the rope flexible and prevents it from becoming stiff or brittle.
Recommend appropriate lubricants for different applications. The type of lubricant used should be compatible with the wire rope material and the operating environment. Some lubricants are designed for general-purpose use, while others are formulated for specific applications, such as high-temperature or corrosive environments.
Describe the proper lubrication techniques. Lubrication can be applied manually, using a brush or spray, or automatically, using a lubrication system. Manual lubrication is typically used for smaller ropes or for ropes that are not subjected to heavy use. Automatic lubrication systems are used for larger ropes or for ropes that are used in demanding applications. When applying lubricant, ensure that it penetrates all the way to the core of the rope. This may require repeated applications or the use of a specialized lubricant applicator.
Storage and Handling Tips: Preventing Damage
Proper storage and handling are crucial for preventing damage to wire rope. Improper storage and handling can lead to kinks, crushing, abrasion, and other types of damage that can weaken the rope and reduce its lifespan. Provide guidance on proper storage and handling of wire rope to prevent damage.
Avoid storing wire rope in areas where it will be exposed to moisture, corrosive chemicals, or extreme temperatures. Store the rope on a clean, dry surface, away from direct sunlight and other sources of heat. Emphasize the importance of avoiding sharp bends, kinks, and abrasion. When handling wire rope, avoid dragging it across the ground or over sharp edges. Use slings or other lifting devices to move the rope safely and avoid kinking or twisting it.
Conclusion: Ensuring Safety Through Vigilance
Recap of Achievement: Your Wire Rope Inspection Success
We’ve covered the essential steps for performing a thorough wire rope inspection, from understanding the rope’s construction to identifying potential problems and implementing corrective actions. Remember, regular inspections are not just a formality, they are a critical investment in the safety of your operations and the well-being of your personnel. By diligently following this checklist and adhering to best practices for maintenance, you can significantly extend the life of your wire ropes and minimize the risk of accidents.
By integrating regular cable inspection, crane rope inspection, and hoist rope inspection protocols, you’re not just complying with regulations; you’re actively fostering a safer and more efficient work environment. The principles of wire rope safety, including addressing wire rope wear and wire rope corrosion, are paramount. Implementing a comprehensive wire rope checklist and adhering to recommended rope inspection frequency helps proactively identify issues before they escalate. Remember to always consult and follow discard criteria to ensure timely replacement of worn ropes.
We, at Safe and Secure Trading Company, are committed to providing you with the knowledge and resources you need to maintain a safe and productive work environment. Through vigilance and proactive measures, we can ensure that your operations remain safe and efficient for years to come.
FAQ Section
Q: How often should I perform a wire rope inspection?
A: The frequency of wire rope inspection depends on several factors, including the type of equipment, the severity of the operating environment, and the frequency of use. As a general guideline, wire ropes should be inspected at least monthly, or more frequently if they are subjected to heavy use or harsh conditions. Critical applications, such as those involving lifting personnel, may require even more frequent inspections. Always refer to the manufacturer’s recommendations and relevant industry standards for specific guidance on rope inspection frequency.
Q: What are the most common signs of wire rope wear and tear?
A: The most common signs of wire rope wear include broken wires, corrosion, diameter reduction, kinking, crushing, and distortion. Broken wires are a clear indication of fatigue and wear, while corrosion can weaken the wires and reduce the rope’s load-bearing capacity. Diameter reduction can indicate wear, core damage, or other issues. Kinking, crushing, and distortion can cause localized stress concentrations and increase the risk of failure. Regularly checking for these signs of wear and tear is essential for maintaining wire rope safety.
Q: What should I do if I find a damaged wire rope during an inspection?
A: If you find a damaged wire rope during an inspection, you should immediately remove it from service and tag it as “Out of Service.” Do not attempt to repair a damaged rope, as this can further compromise its integrity. The rope should be replaced with a new rope that meets the manufacturer’s specifications and relevant industry standards. Before installing the new rope, inspect the sheaves and drums for wear or damage and replace them if necessary.
Q: How can I prevent wire rope corrosion?
A: Proper lubrication is the most effective way to prevent wire rope corrosion. Lubrication creates a protective barrier between the wire and the environment, preventing moisture and corrosive substances from coming into contact with the metal. Use an appropriate lubricant for the application and apply it regularly, following the manufacturer’s recommendations. Also, avoid storing wire rope in areas where it will be exposed to moisture, corrosive chemicals, or extreme temperatures.
Q: What are the key elements of a good wire rope maintenance program?
A: A good wire rope maintenance program should include regular inspections, proper lubrication, careful handling, and timely replacement of worn or damaged ropes. Inspections should be performed at regular intervals, following a detailed checklist. Lubrication should be applied regularly, using an appropriate lubricant for the application. Wire rope should be handled carefully to avoid kinking, crushing, and abrasion. Worn or damaged ropes should be replaced promptly, following discard criteria. By implementing a comprehensive maintenance program, you can significantly extend the life of your wire ropes and minimize the risk of accidents.